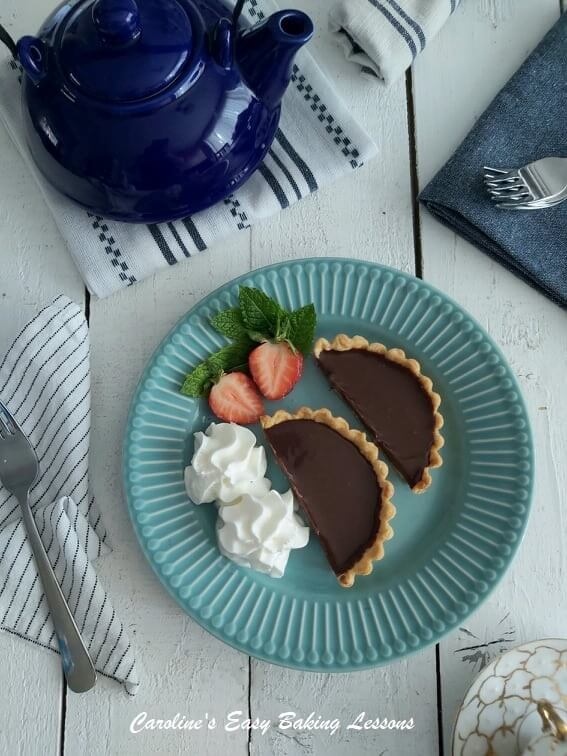
Individual Chocolate Tarts

Here's my thoroughly indulgent, individual chocolate tarts, using shortcrust pastry. My sweet shortcrust recipe is all you need to know to be successful with pastry.
Individual Chocolate Tarts
How To Easily Make This Indulgent Dessert


Can Be Made In Stages Or Ahead
Can be made in two stages, saving you some time, and can also be made ahead of time if stored in the fridge.
Tins & Cutters Used
I made them in small fluted tart tins with loose bases, and are 8.5cm/ 3.25 “ in diameter. I have also made with scraps of pastry in mini tart tins too. Just make sure to roll your pastry a little thinner and bake a little less.
Alternative To Pastry Tins
You can even use small cupcake liners in a cupcake tray if you don’t have any pastry/tart tins.


Cutting The Pastry
For cutting out the pastry, I used a pastry/cookie cutter larger than the diameter of the tart tins. I used my largest one at 12cm (4.75″), to give enough pastry to go up the sides of the tin too.
Recipe Yield & Freezing
The recipe is for 6 individual chocolate tarts, but there will be left over chocolate filling & pastry. Rather than downsize, you can of course use the leftovers to make mini ones or save the uncooked pastry & freeze for later.


Label it & periodically add to it & you will have enough for a pie in no time. Also I have a great recipe for leftover chocolate filling – it is essentially a chocolate ganache that you could use to cover cupcakes if you wanted.
Other Uses For Chocolate Ganache
I like to let it firm up & add some more simple ingredients to make delicious chocolate truffles or Protein Power-balls if that’s your thing). Go to my chocolate truffle recipe.
Serving Individual Chocolate Tarts
These pair nicely with fresh cream & seasonal fruits. The recipe consists of a sweet pie pastry & chocolate ganache. Both of which I have separate recipes for.

Link To My Sweet Shortcrust Pastry
So as not to make the recipe too long (and because you can make in stages), I have added links to make the pastry and ganache and then how to construct and bake the individual chocolate tarts. The pastry recipe, also includes lots of tips if you have problems making pastry.
Recipe Card – Abbreviated Recipe
I am also trying out a new feature – Recipe Cards. This is basically an abbreviated version of the recipe. My style as many will know, is thorough and very comprehensive instructions and photos, intended for beginner bakers.
the Fillings
Since these tarts are pre-baked before filling, you have other choices when it comes to what you fill them with. Not a fan of chocolate? (Is that possible?) Then why not try my easy pastry cream recipe. Also known as Crème Patissière, or creme pat for short, this is a lighter alternative to chocolate ganache.


Easily made on the hob, this pastry cream can not only be used for pastry. Add it to serve with cakes and puddings (our British custard is a thicker version of creme pat).
See here photos of reader Diana’s tarts filled with the pastry cream and topped with fresh fruit, making this a perfect summer dessert.


Skip To Recipe Option
I know a lot of my readers have some baking experience, so these recipe cards are intended for them. Use ‘skip to recipe’ feature (shows as ‘Jump To Recipe’). This will skip to the abbreviated recipe card version, not the step-by-step instructions, so just bear that in mind.
Jump to VideoDOWNLOAD
And the full recipe can be downloaded to save to your phone or computer, by simply clicking the ‘download’ button below.
INDIVIDUAL CHOCOLATE TARTS (C.E.B.L.)
Click to go to abbreviated recipe card –Jump to Recipe
Step-By-Step Instructions


MAKE THE PASTRY
1. First step (and you can do day before), is to prepare the pastry. To make the pastry, go to the Sweet Shortcrust Pastry recipe. See Photo 1.
2. Once prepared, wrap in cling film/plastic wrap and place on a flat plate, into the fridge for 30 minutes before rolling out. You can also leave overnight to make the next day. Just be sure to bring out of the fridge at least 30 minutes before you want to use it or it will be too cold and hard to roll. Just make sure it doesn’t get too soft or you will need to refrigerate again before rolling out.


MAKE THE PIE TART CASE – Rolling Out
3. Cut some baking/parchment paper to work on (optional but means less mess and easier to roll out), and then dust with either some flour, cornflour/starch or icing/powdered sugar.
4. Now dust the rolling pin too and either roll the pastry out directly with the pin, or use a 2nd piece of paper on top. Roll out in all directions till the pastry is about 3mm (1/8″) thick. (See Photo 2). If using smaller tins than I did, you might want to roll out just a little thinner.
5. Once all rolled out, take a cookie/pastry cutter or something like a large round lid (wider than the pie dish diameter, see above note) and dip in flour to prevent it sticking.
Cutting Out
6. Cut out 6 circles of pastry and then carefully pull back the scrap excess pastry and either roll again for smaller tarts, or wrap in paper and then in a food bag, label and freeze for another time. See Photo 2.


7. Grease your tart tins. I either use baking sprays (Frylight Onecal is good), or homemade lining paste (see recipe). See Photo 3.
8. Before lifting the pastry, hold one of the tins above the pastry just to check it’s going to be wide enough. If it looks a little too small for the depth of your tins, take your rolling pin and roll the ends out a little. Then carefully lift one of the pastry circles (use a baker’s palette knife is needed) and place into the centre of the tart tin.


Use your fingers to guide the pastry into the shape of the tin, and into the fluted sides. You can also take a small ball of the scrap dough and use it to press against the pastry, to fit in to the tin.
9. Run the rolling pin over the top of the tin to remove any excess pastry from the top edges. Then something I like to do to avoid too much shrinking on baking, is to gently squeeze the pastry on the sides of the tin, up a little bit. Don’t do it too much and make the pastry too thin. See Photo 4 above.


‘Dock’ The Pastry
10. Now take a fork and ‘dock’ the base of the pastry by simply making lots of holes. This ensures that steam can escape when baking and reduces the chances of a ‘soggy bottom’ to your tart. Repeat for the other 5 pastries. See Photo 5.
Chill The Pastry Case
11. Now a very important stage is to chill the pastry before baking. This relaxes the gluten in the pastry (over-worked gluten produces a tough pastry), as well as firming the dough to help keep it’s shape on baking. Simply place the 6 tart tins on a baking tray/sheet that will fit in your fridge and chill for 30 minutes (or you can freeze for 15 minutes if in a hurry).


12. Once the chilling time is nearly up, heat up your oven to 190/170c Fan Oven/375f/Gas Mark 5.
‘Blind Baking’ The Pastry Cases
13. Now prepare to weigh down the tarts by cutting squares of tin foil/aluminum foil (you can use baking/parchment paper but I am not as keen on it and a tip is to scrunch it up and then flatten out, to soften the paper and reduce chances of making holes in your pastry). You want squares that are just a little wider than your tart tins to be able to cover them, including the edges. I tend to cut a piece and then cut in half to make 2 pieces. See Photo 6.


Baking The Pastry Cases
14. You can use silicone baking beans, uncooked rice or uncooked dry beans (I use the latter and store once cooled in a jar ready for next pastry baking). And they are used to weigh down the pastry, giving us a ‘case’ as opposed to just a block of pastry on baking.
Take a square of the foil, place in the centre of the pastry, push down and up the sides, and let the foil go over the edges, so no pastry is visible. Then simply use enough of the beans to fill the pastry case, right up to the top. This is important as if you just fill to hold the foil down the foil, you can have shrinkage on the sides. Repeat with the other 5 pastries. See Photo 7.
And Bake…
15. Bake the pastries like this with no filling (called ‘blind baking’ or ‘par/part baking’, for 15 minutes.


16. Very carefully turn the foil up over the beans, close it & remove from the pastry. Be careful not to drop any beans in the pastry (if you do, use a fork to remove it, remember it will be hot and smooth down the pastry). See Photo 8 above. Leave the foil and beans out to cool down. Note if any of your pastries are not forming a ‘case’ shape keep the foil and beans on top and continue baking a few more minutes. You might notice this if you make very small ones and your pastry is rolled too thick, it will puff up too much with not enough weight to weigh it down. See Photo 9.
Reduce the oven temperature to 170/150c Fan Oven/350f/Gas Mark 4.


Egg-wash The Cases
17. Whisk an egg with a splash of milk and brush this ‘egg wash’ onto the base of the pastry and onto the edges, before placing back in the oven to finish baking for about 5-10 minutes until golden and set all the way through. See Photo 10. (Mine took 8 minutes).
Cooling The Cases
18. Remove from the oven and leave on the baking sheet/tray, on top of a cooling rack for about 10 minutes before removing the tray/sheet. Then leave to cool down completely before removing the cases. The filling should not be added until the pastries are cooled.


Making The Ganache Filling
19. To make the filling, see my ganache recipe. Proceed to step 5 of the ganache recipe. At the same time as mixing the cream and chocolate, you can add in the 1 rounded tbsp liquid glucose (or you can add at the same time as the chocolate like in the video). This is optional but does firm and set the ganache a little quicker. Then add in gradually, the small cubes of butter, mixing well in-between each addition. Once all mixed through, it should be smooth and shiny. See Photo 11.
Leave to cool for another 10 minutes or so, while the cases cool.


Constructing The Tarts
20. Place the tarts on a tray that will fit in your fridge.
21. Very carefully spoon the ganache into the pastry cases, leaving a little gap from the top (about 2 – 3 mm or 1/8″). See Photo 12.
22. Now carefully transfer the tray with the pastries into the fridge to set for at least 3 hours. If you don’t use liquid glucose, this might take longer.
Left-over Ganache
23. Any left-over ganache can be left in the bowl, covered with cling film/plastic wrap and left at room temperature (just be aware placing in the fridge, it will set up and you might have to then leave at room temperature before you can use it). Use the left over to top cupcakes, cakes, or whisk it to make a lighter topping – see my whisked chocolate and orange ganache recipe. Alternatively, use to make Chocolate Truffles.


Serving The Individual Tarts
24. Once the tarts are set or you are ready to eat, simply add some whipped cream, and or fruits of your choice.
25. Left-overs can be stored in the fridge, covered and last a few days.
26. Pre-baked or even baked pastry shells could also be frozen. Just well-wrap in paper first. before cling film/plastic wrap and when you want to use them, part defrost them at room temperature and bake while still cold. You might need to bake a little longer.


More Reader’s Photos
Use the same recipe and sweet shortcrust pastry cases and instead fill with my Pastry Creme (Crème Patissière) & fresh fruit.
See photo here of reader Diana W’s bake of these chocolate tarts. And she even made some for Valentine’s day, in heart shaped pastry tins.
I think they look wonderful! Send me your photos if you use my recipes.


Share The Love
Please see the sharing options or even printing, at the right/bottom of your screen (bottom of your screen for mobiles, and down the right-hand side on computers). You can even pin this to your own Pinterest page. Alternatively, you can download this article, see below. You could also leave some feedback if you like.
Click the ‘Download’ button below, to save the Individual Chocolate Tarts recipe to your phone or computer.
DIFFICULTY LEVEL: easy with guidance
RECIPE CARD
Individual Chocolate Tarts – With A Sweet Shortcrust Pastry

Equipment
- Scales or measuring cups
- Large spoon
- Knife
- Measuring Spoons
- Cling film/plastic wrap
- Dinner plate
- Small Jug (optional)
- Medium pan or Microwave-safe Bowl
- Chopping board and large knife Mixing spoon
- Small pie/tart tins (see above)
- Rolling Pin
- Baking/parchment paper (optional)
- Tin Foil (aluminum foil)
- Some flour, cornflour/starch or icing/powdered sugar
- Large cookie/pastry cutters/lids for cutting & bigger than your tart tin diameter
- Baking beans/dried uncooked beans/uncooked rice
- Timer
- Cooling rack
- Baking tray/sheet to hold the tart tins
Ingredients
- 175 g Plain Flour (6 oz, 1 ¼ Cup + 1 tbsp All Purpose)
- 75 g Butter, cubed (cold) (2.5 oz or ⅔ stick)
- 20 g Icing Sugar, sieved (3 Tbsp Powdered sugar, sieved)
- 1 Medium Egg, beaten (Large egg, US)
- Ice Cold Water, (small amount)
- 300 ml Double Cream (10 fl oz, 1 ¼ cup Heavy/Whipping Cream)
- 150 g Milk Chocolate (5.25 oz semi-sweet chocolate)
- 150 g Dark Chocolate (5.25 oz bitter chocolate)
- 1 tbsp Liquid Glucose, rounded (optional)
- 60 g Butter, unsalted & cubed small (2 oz, 4 tbsp)
Instructions
PREPARE THE PASTRY
- Make the sweet shortcrust pastry as in the recipe provided (see Notes at bottom for the link, or the full recipe above).
- Place in the fridge for 30 minutes before forming the pastry case
PREPARE THE PASTRY CASE
- Using cornflour/starch, flour, icing/powdered sugar or 2 sheets of paper, roll out the pastry to 3mm (⅛") thick.
- Grease the tart tins well (see below for recommendation).
- Cut out pastry circles, bigger than the tart tin diameter and centre in the tart tins, and then fit in to and up the sides of the tin.
- Cut off the excess pastry by running a rolling pin over the edges. 'Dock' the pastry by making holes in the base of the pastry with a fork.
- Line the pastry cases with foil and make sure the edges are covered, before filling to the top with baking beans or dried beans.
- Place in the fridge for 30 minutes to chill and relax the dough. Pre-heat the oven to 190°c/170°c Fan Oven/375°f/Gas Mark 5.
- Bake the pastries like this with no filling (called ‘blind baking’ or ‘par/part baking’, for 15 minutes.
- Very carefully fold over the foil and remove foil and beans. Reduce the oven temperature to 170°c/150°c Fan Oven/350°f/Gas Mark 4.
- Apply egg wash (1 egg & splash of milk) to the pastry and bake for about 5-10 minutes until golden and set all the way through.
- Leave on the baking sheet/tray, on top of a cooling rack for about 10 minutes before removing the tray/sheet. Then leave to cool down completely before removing the cases. The filling should not be added until the pastries are cooled.
MAKE THE CHOCOLATE GANACHE FILLING
- To make the filling, see my ganache recipe link below. Proceed to step 5 of the ganache recipe. At the same time as mixing the cream and chocolate, you can add in the 1 rounded tbsp liquid glucose (or you can add at the same time as the chocolate like in the video). This is optional but firms the filling quicker.
- Then add in gradually, the small cubes of butter, mixing well in-between each addition. Once all mixed through, it should be smooth and shiny. Leave to cool for another 10 minutes or so, while the pastry cases cool.
CONSTRUCTING THE TARTS
- Place the tarts on a tray that will fit in your fridge. Very carefully spoon the ganache into the pastry cases, leaving a little gap from the top (about 2 – 3 mm or ⅛″).
- Now carefully transfer the tray with the pastries into the fridge to set for at least 3 hours. If you don’t use liquid glucose, this might take longer. (See full recipe for left-over ganache uses)
- Once the tarts are set or you are ready to eat, simply add some whipped cream, and or fruits of your choice.
Video
Notes

 LINKS TO RECIPES
Pastry Cream Recipe
Sweet Shortcrust Pastry Recipe
Chocolate Ganache Recipe – Chocolate Ganache Recipe
For greasing the tins, see Lining Paste
LINKS TO RECIPES
Pastry Cream Recipe
Sweet Shortcrust Pastry Recipe
Chocolate Ganache Recipe – Chocolate Ganache Recipe
For greasing the tins, see Lining Paste


Subscribe For More Recipes
Want more great recipes, tips, baking information and newsletters? Then please consider subscribing by adding your email address below. Be sure to check for a confirmation email & respond back, so you can follow me & receive your free emails. Your personal information will not be shared with a third party.
Join My Facebook Group
Why not also join my – Facebook group Easy Online Baking Lessons, dedicated to this baking lessons website, as well as providing one-on-one support with myself & my team? Be sure to answer all security questions when requesting to join.
Follow me on social media:
Happy Learning & Baking!
Caro x


Individual Chocolate Tarts
Search For Something You Fancy!
Caroline’s Easy Baking Lessons


What a great recipe. I used this recipe and decorated them with fresh fruit which were lovely and also made some in heart shape tins for Valentines.
I knew if I looked I would surely find something in the midst of all this deliciousness to bake! Goodness gracious…YUM TO THESE!
Thanks so much Jenny for your kind words.