Classic Victoria Sandwich Cake For Beginners

Let me guide you in making Classic Victoria Sandwich Cake for beginners, but also for those who struggle to get the perfect rise & light open texture this British iconic cake has. Fill just with jam, or add berries & whipped cream. Includes lots of tips along the way, as well as how to stop the piped cream buckling when adding the second cake layer. As always, measurements included & tested, in grams, ounces & cups for your convenience.
Classic Victoria Sandwich Cake For Beginners
All You Need To Know For A Perfect Rise


***click to jump to section***


What Is A Victoria Sandwich?
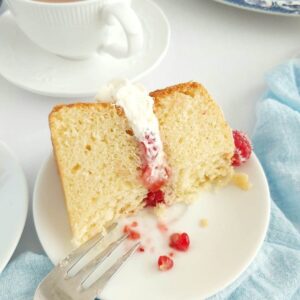
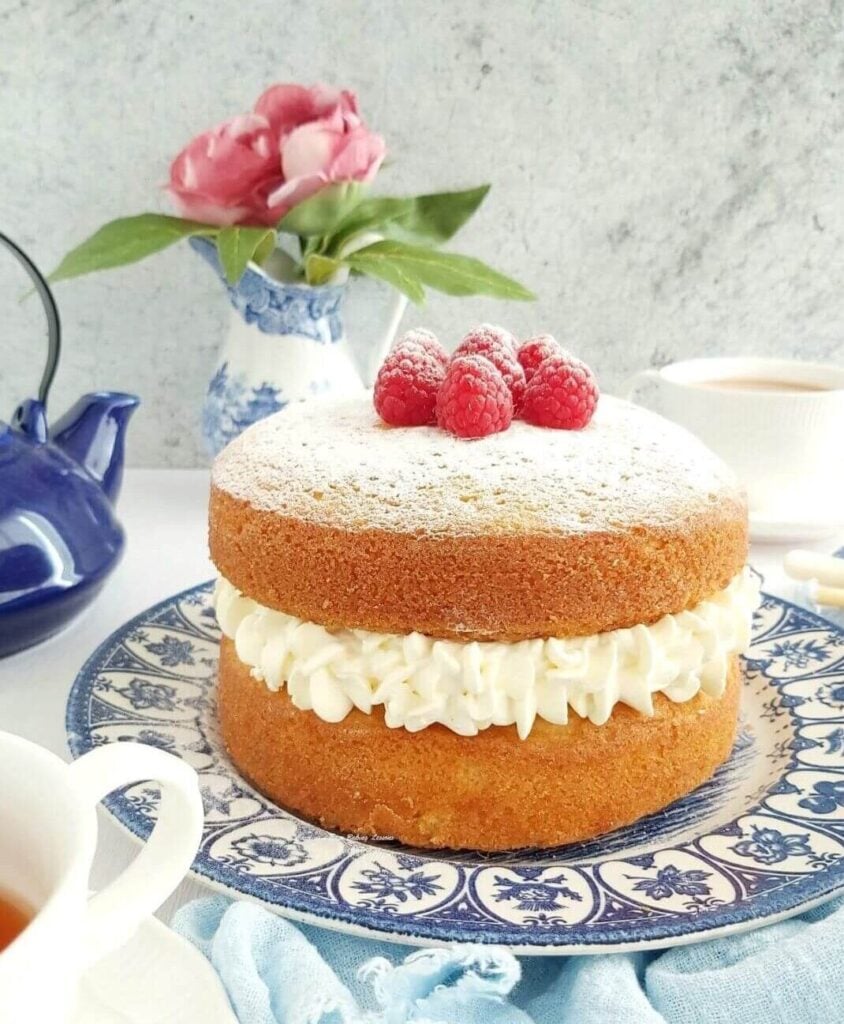
A Victoria Sandwich is a classic British layer cake, made of 2 vanilla sponge cakes, sandwiching a jam & cream filling. A basic uncomplicated cake, that requires no decorating. Its beauty comes from the light airy texture the sponge provides & pairs perfectly with jam & whipped cream. A very light, not heavy to eat cake. (For US readers, we Brits use the word sponge for some of our cakes). You might also hear the cake being called a Victoria Sponge Cake.
Why Is It Called Victoria Sandwich?
This British tea-time cake, goes back to the time of Queen Victoria. It is believed that Queen Victoria enjoyed a slice of Victoria Sandwich cake when she had her afternoon-tea. However, it pre-dates even when Queen Victoria was said to eat it. Read more on its history, by visiting – Grant’s Bakery – History Of Victoria Sponge Cake.
Why Use This Recipe?
1. Thorough instructions & explanations
2. Detailed process photos to guide you
3. Tested gram, ounce & cup measurements provided
4. Other conversions provided (oven temperature etc.)
5. Real photos with no digital enhancement/filters
6. Lots of tips included in the recipe & not after it
7. British recipe, as we have here in the UK
8. Tips for making ahead, storing & freezing
Characteristics of A Victoria Sandwich Cake


The Sponge (Cake)
A Victoria Sandwich cake is made of the usual ingredients – butter, sugar, eggs, flour (typically UK Self-raising) and sometimes Vanilla Extract & a little milk. The proportions of these ingredients, is what produces a cake that’s much lighter, and has a more open-texture than say a British Madeira Cake, or US Pound Cake. (See photo). This is why sometimes it is referred to as a Victoria Sponge cake.
All Victoria Sandwich recipes will have these same proportions, and only vary slightly depending on the cake tin used. Typically, all the main ingredients weigh the same amount. Sieving and through ‘creaming’ of the butter & sugar at the beginning, also contributes to a light airy sponge.
Ingredient Notes


The Flour
Victoria Sandwich cakes always use Self-raising flour. This UK flour is very similar to US Self-rising. However, UK self-raising contains slightly more baking powder than the US version.
You can of course use plain flour (All Purpose) if you need to, and I have included the amount of baking powder to use in that instance, in the recipe card below. I ALWAYS provide details on how to make my recipes, using plain/All Purpose flour and baking powder after testing.
Note, I do tend to use less than the recommended amount of baking powder though as I find it can give a bitter metallic after taste. (Read more in Differences In UK & US Baking Ingredients)


The Sugar
The equivalent to Caster Sugar is known as ‘Extra Fine or Super fine sugar’ in the US. Domino is a particular brand that is available in the states. Berry Sugar, Fruit Sugar, Baker’s Sugar can all be used as a substitute too. You can also make your own from granulated sugar. Please note though that US regular (granulated) sugar is finer than our UK granulated. (See my comparison photo of UK sugars).


Be careful grinding in a processor too much, (too fine is like icing/powdered sugar). Don’t ruin your machine. Some use coffee bean grinders. Grind in small batches & weigh or measure as you go.
Why Use Caster Sugar & Not Granulated?
I often hear this asked, if granulated sugar can be used and the answer is for some bakes, yes you can. However, there are some points to note. Unless if the sugar is being melted, to say make a drizzle, then caster sugar is there not only providing sweetness and moisture, but also as it creates friction when ‘creaming’ with the butter. This process of rubbing, the small sugar crystals with the butter, creates friction. This in turn produces air pockets, and these give a nice rise and light texture to the cake.
UK recipes typically use Caster sugar, and so they have been written & developed using this sugar. Therefore if you were to use granulated sugar, you would need to cream the butter & sugar much longer than the recipe instructs, because it will not only take longer for the sugar to break down, but also for the required amount of air to be incorporated into the batter.

With meringues and macarons, I always advise on using caster/fine sugar, again because of the reactions that are occurring.
For most cakes, using granulated sugar instead, they will still bake off nice, but they will not be exactly as intended by the recipe developer. And this is something to keep in mind. Especially if your end bake does not result in what you expected, as it can often be because of these small changes.
Troubleshooting Victoria Sandwich Cakes


Cakes That Don’t Rise Enough
For some a Victoria Sandwich cake can be hard to master. As I mentioned, it should have a light and airy texture. So here are things to bear in mind:
1.Too Much Baking Powder
Beware or recipes that use too much baking powder. Some recipes will use self-raising or self-rising flour and additional baking powder. These can give an unpleasant bitter and metallic after-taste. But more noticeably, having too much raising agent and not enough flour to support it, they prematurely rise and then sink back down. The end result is a more dense cake and much more close-texture crumb. For some people their cake might even sink in the middle.


2. Don’t Use ‘All-In-One’ Recipes
‘All-In-One’ method recipes, do not get as much air into the batter, since there is no ‘creaming’ of the butter and sugar together. And as mentioned above, this repeated movement creates air pockets that result in air being incorporated into the batter, producing a lighter cake.
Incorporating natural air in to the batter (ie. no additional baking powder), and being careful not to over-mix, all help produce a good rise to your cake.
3. Sieve, Sieve & Sieve High
Sieving your flour, and even twice, before adding to your cake batter, incorporates natural air into your batter. You should also sieve baking powder and bicarbonate of soda/baking soda when using. Not only does it remove lumps, but these lumps can create little tiny brown spots in your bakes (not to be confused with larger spots known as ‘hot spots’, from as the name suggests, areas in your oven where there is extra areas of heat. You can see in my baked cake down in Photo 7 an example of several darker spots).
To get even more air into your cake batter, hold the sieve higher, above the bowl, rather than resting on the bowl. For other tips on avoiding dense cakes, see my lesson on Over-mixing Cake Batter & Cakes That Don’t Rise.


Typical Victoria Sandwich Filling
Victoria Sandwich cakes originally only were filled with jam (strawberry and raspberry being favourites). And dusted on top with icing/powdered sugar or caster sugar.
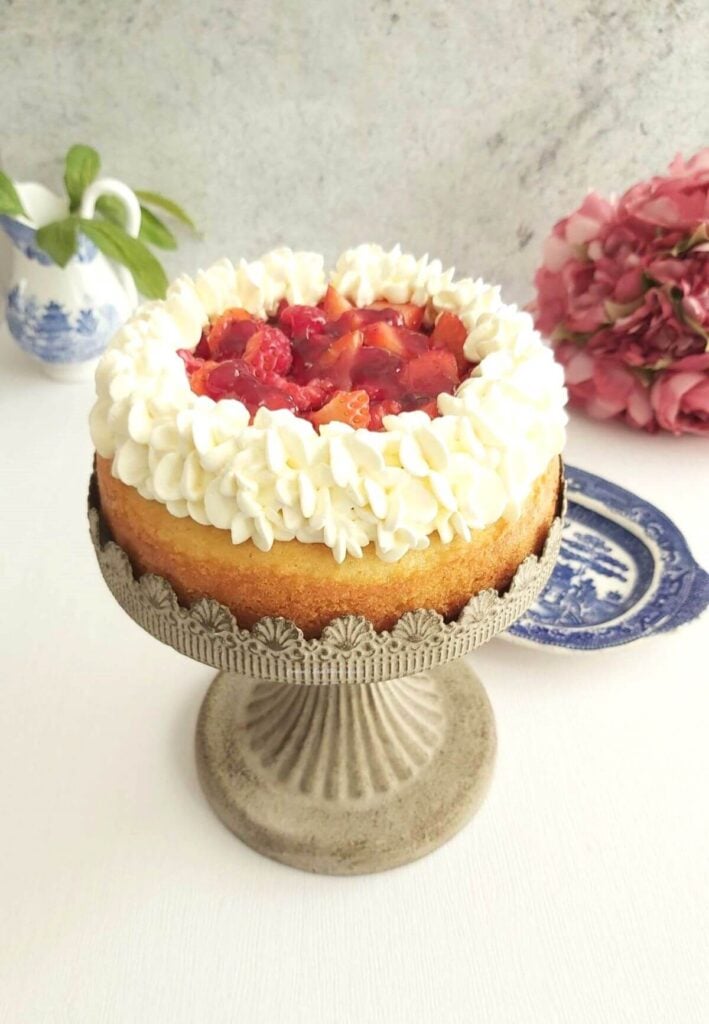
Whipped cream and later some strawberries or raspberries came into the picture. It wasn’t until more recent times that buttercream was used as a filling, and after that there was a trend for some of also topping the cake with buttercream, whipped cream and/or berries. This makes for a much more filling, and decadent slice of cake, making it much more suitable for special occasions, rather than the simple afternoon tea snack it began as.
(See photo below of alternative way to top your cake)


Not got the correct cake tin size?
Use my calculator and instructions on how to increase a recipe for a bigger tin, or how to reduce a recipe for a smaller tin. Note on the bottom of the recipe card, I have included the ingredient amounts for using 2 x 8″/20cm tins, where the baking time will be about the same.
More Baking Tips
For more baking tips, check my Baking Info page. All my recipes have measurement conversions, that have been hand measured and tested during recipe development, as Google can be inaccurate & inconsistent with its results. For other recipes, use my Handy Table Of Common Baking Ingredient Conversions.
Recipe Card
Here’s the Recipe Card for Victoria Sandwich Cake. Save or share, print it too, with the option to print with/without the photos. There is also a cool new feature called ‘Cook Mode’ – prevents your screen going black if using the recipe card as you bake-along. Just toggle the Cook Mode option (when on, the colour of the button will be blue).
Classic Victoria Sandwich Cake For Beginners

Equipment
- 2 6” (15¼ cm) Cake Tins (Also known as Sandwich tins. See notes for bigger/smaller tin sizes)
- Baking/parchment paper
- Baking spray, lining paste, or butter to grease (see note in instructions, or make Lining Paste)
- Scales or measuring cups
- Measuring Spoons
- Hand or Stand Mixer (or a wooden spoon)
- Sieve
- Large Metal spoon
- Timer or Phone Timer
- Cocktail sticks
- Cooling rack
- Baking Palette knife or butter knife
- Clean Soft Tea-towel (optional)
- Bowl for whipping cream
- Small sieve (optional)
- Piping bag & nozzle (optional, or food bag)
Ingredients
- 162 grams Butter (5¾ oz, ¾ cup, unsalted, soft & cubed)
- 162 grams Castor Sugar (5¾ oz, ¾ cup of super/extra fine sugar, Domino’s etc. *See note above & below)
- 3 Eggs, medium – large (US Large – XLarge eggs)
- 162 grams Self-raising Flour (5¾ oz, 1⅓ cups Self-rising Flour + ¾ tsp Baking Powder) OR 1⅓ cups Plain/All Purpose Flour + 2¾ tsp Baking Powder – see notes)
- ¾ tsp Vanilla Extract (read about Homemade Vanilla Extract)
- 2 tsp Milk
For Filling & Topping
- 180+ ml Double Cream (Minimum 6 fl oz, ¾ cup Heavy/Whipping cream up to 280ml or 9½ fl oz, 1⅛ cup if using on top too. See notes)
- 4-5 tbsp Raspberry Jam/jelly (or own choice, sour/black cherry is nice too)
- Icing/Powdered sugar (for dusting)
- Strawberries, raspberries or other berries (optional)
OVEN: 180c/160c Fan Oven/350f/Gas Mark 4*
Instructions
- While measuring or weighing out your butter, cut into cubes about 1cm, ⅓″ size. A smaller surface area will soften quicker as well as be easier to mix with. If in a hurry, or you forget to take out on time, here’s a hack I tried. Soften Butter In About 12 Minutes.


- Add the sugar to the softened butter, in a medium mixing bowl or on the bowl of your stand mixer. Tip – if using scales, you can place the bowl on top and press the TARE button to set to zero, before adding your sugar in to the desired weight. This will reduce the amount of bowls you use. Now beat the sugar and butter together, (use the k-paddle attachment for your stand mixer), until very smooth, creamy and paler in colour. This is known as 'creaming' and the best method for incorporating air into the batter, for a nice light cake. Learn more in the notes before the recipe card.
- Next add the eggs, one at a time, and mix on low to medium speed, only until mixed through. Also known as ‘amalgamated’ or you might read the term ‘emulsified’. (See Photo 2 below). Emulsify just means combining two liquids that don't normally want to mix together (examples being vinegar and oil). So for our recipe, at this point we are trying to emulsify eggs and butter. This is why sometimes after adding the eggs, your batter might look a little curdled or split. If this does happen, add a few spoons of your flour while mixing in the eggs. That said, you don’t need to worry about it, as it will bake out fine.

- Top Tip – For even more height to your cake, you can whisk the eggs first. Whisking activates protein in the egg, and this protein provides structure for your bake. Now add the vanilla extract, and mix briefly.

- Sieve the flour (and baking powder if using Plain or All Purpose flour), on top of the batter. Tip – for more rise, you can also sieve in a different bowl, before sieving a second time on top of the batter. See Photo 3 above. Mix on a low speed to begin with, add in the milk & increase to medium speed, until all incorporated & you have a smooth thick batter. Mix only until no flour is visible. Do not be tempted to over-mix as it can knock out the air you incorporated, which can cause a cake not to rise as well. Holding the sieve a bit higher above the bowl, can also get more air into your cake batter.

- Heat the oven to 180°c/160°c Fan oven/350°f/Gas Mark 4. (You know your own oven, so if it takes longer than 7 – 10 minutes to reach temperature, put on a bit earlier.)

- Prepare your cake tins by greasing well, before lining the bottom. Check out my review of Homemade Lining Paste/Cake Goop by Bake Off winner Nancy Birtwhistle. Alternatively, you can use a Quick Release of Cooking/Baking spray (such as FryLight spray). Or softened butter & flour. But be sure to cut a circle of baking/parchment paper for the bottom of the tin too. Check my article for cutting to fit any sized round tin. Or see my video on how to fold paper circles to fit a cake tin. And simply place in position, on top of the greased tin. Note I prepare the cake tins at this stage, (not at the very beginning),so that the paper sticks nicely in place.

- Now add the cake batter evenly between the two cake tins and smooth out the top, best you can, with the back of a spoon. Tap the tins a few times on the counter/worktop to expel any trapped air.
- Now for a slightly better bake, I like to reduce the temperature slightly, before putting the cakes in the oven – to 170°c/150°c fan oven/340°f/Gas Mark 3½*. Then pop the 2 cake tins in the centre of the oven to bake for about 20 – 25 minutes. If your oven doesn't bake evenly or has hot spots, turn the tins after the half-way mark (and they will not deflate). So wait until at least 13 minutes before opening the oven. Then begin checking if the cake is ready, from about the 19 minute mark.

- The sponges should be a golden colour, but you need to be sure they are fully baked. Use a cocktail stick/tooth pick, and make a hole in the centre of the cake. You want it to come out dry & clean of any crumbs. If not, pop back in the oven for 2 more minutes and keep checking until done. Other indicators of when the cake is ready are – springy to touch, and you will be able to see the sponge coming away from the sides of the tin. Leave to cool in the tins, on top of a cooling rack for at least 10 minutes.

- Take the tins off the cooling rack, and place a clean, folded tea-towel on top of the cooling rack. Then turn the cake tins over to release the sponges on to the tea-towel. (If sticking at the sides at all, just run a palette knife around the sides). Leave in this upside-down position to cool, for at least 10 minutes before attempting to carefully peel back the paper. If they are not coming off easily, leave to cool a bit more.
- TOP TIP – Placing cakes on the tea towel means there are no rack marks left on the cake. If you intend to fully decorate on top, this is not important. But if going for the classic look for a Victoria Sandwich cake, you don’t really want lines showing on top. And leaving to cool upside down also results in less of a dome. (But also please note a dome to the top layer of a Victoria Sandwich, is classic).


Decorate The Cake
- While the cakes are cooling, use a hand/stand-mixer to whip up the double/heavy/whipping cream, until very thick and has stiff peaks. See Photo 12 below. Watch my quick whipping cream video if you aren’t sure how it should look. Be careful not to over-whisk the cream, as you can end up making butter! (It will start to separate and be a yellow/cream colour). Add a little vanilla extract and icing/powdered sugar to the cream if you like, but is optional & added to taste.

- When the cakes are cooled, place the layer of sponge you want to be on the bottom, onto a cake stand or large plate. If this layer of sponge is domed (rounded) too much, you can trim some of the cake off, to make a bit more flat. But I often don't bother and keep the one with the largest dome for the top of the cake. I also don't like cutting cake as I am not great at it. So I do have a good tip, that involves piping the cream border taller, to try bring that base layer more level.
- Next spread some jam/preserve on top of this cake layer, but just in the centre area, leaving a gap of about 1"/2.5cm around the edges, for where you will pipe the cream. (See Photo 10 below). If you trimmed the cake, spread a little jam on top thinly, and then a second thin layer on top to catch the crumbs. **Make sure your jam is not too thin that it will run down the cake. You can also pipe a border of cream first to stop it running off the cake.
- Fill a piping bag (or even a food bag), and fit with a closed star tipped nozzle (optional). (New to piping bags, read my lesson on Assembling & Filling A Piping Bag). You can just spread the cream on top of the jam, but piping will look neater, and I have a nice tip for keeping the cake from buckling once the second layer goes on.

- Pipe a border of the cream around the edge of the cake, being careful to leave a tiny gap at the end. Then place some cut pieces of raspberries and strawberries on top of the jam (optional). You can drizzle a bit more jam on top of the fruit too if you like. See Photos 10 & 11.

- Now pipe again, on top of the rosettes of cream you already piped, making that cream border taller, and just slightly above the height of the fruit centre. See Photo 12 below. This would even make a nice smaller single layer cake left like this. And as well as getting more fruit and cream in there, it also means you don't need to cut a domed cake, and can level it all of this way instead, and stop the top layer falling off.

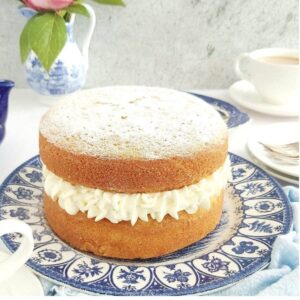
- TOP TIP FOR PHOTO READY CAKE – for the cream filling in any layer cake to hold its shape better, after the top layer is on, and not buckle from the weight, place this cream topped base layer in the fridge for about 30 mins first. After that, the cream will have firmed & you can position the 2nd layer of cake on top, without the cream immediately flattening/buckling. Just position on top carefully (dome side upwards), & don't push down or squeeze the cake. Chilling also helps with cleaner slices, so you can even chill again after decorating. See Photo 13 below of a comparison of 2 layer cakes, (the one on the right is Raspberry Swirl Victoria Sandwich Cake

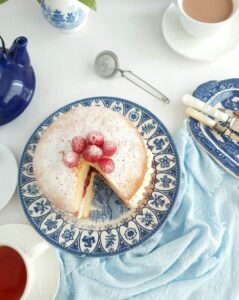
- Next sieve over some icing/powdered sugar. (See Photo 13 above, with a little dome to the top layer). This is a classic Victoria Sandwich, but I added a little extra touch, and hint of what is inside the cake, by adding a few raspberries on top, in the centre. You could use strawberries instead. And then sieve over a little more sugar and the cake is complete. See Photo 14 below.

- You can eat right away, but for easier cutting (and eating), I like to pop the cake in the fridge for 20-30 minutes. This gives the cake a little time to set up with all the layers together, and again stops the cream oozing out.


Serving & Storing
- This cake will make 6 – 8 slices. And remember the cake is tall! Serve as is, or with some more of the berries, and some of the left-over cream if you like. Perfect with tea!

- Store under a glass cake dome, in room temperature for a day or two. If stored in a cooler environment, or in an airtight container/tin, it will be fine for 3-4 days. Warm environment and the cream will not be so good.
- Top Tip – you can also store a tall layer cake in a large, deep airtight container. Just place the cake on top of the underside of the lid & place the container on top of the cake, so effectively having the container upside down. So when you come to open it up, you don't have to lift the cake out to get at it.

- The cake layers can be made ahead of time, (up to 3 days), if well wrapped individually, in cling film/plastic wrap after cooling completely. Store at room temperature and then assemble when ready. If you want one layer to be flatter, you can also store upside down, with the second layer on top. With time, this helps flatten the cake a little.
- The cooled sponge layers can also be frozen for up to 3 months1, if well wrapped in baking/parchment paper, and then cling film/plastic wrap, and either foil or a food bag on top. Freezing an assembled and filled cake is not recommended. Freezeit.co.uk also recommend defrosting in the fridge overnight, as thawing at room temperature can dry the cake out2.


Video
Notes

 Substitutes – the recipe card lists alternative names for ingredients, but also please see notes before the recipe, about why certain ingredients are used and things to avoid. And to clarify, if not using UK Self-raising flour, be sure to add the amount of baking powder listed in the ingredient section above.
Cream – the amount needed for how I have filled the Victoria Sandwich cake in all the photos, is given as the minimum amount listed, and the greater amount is if you wanted to also top the cake with more piped cream.
Substitutes – the recipe card lists alternative names for ingredients, but also please see notes before the recipe, about why certain ingredients are used and things to avoid. And to clarify, if not using UK Self-raising flour, be sure to add the amount of baking powder listed in the ingredient section above.
Cream – the amount needed for how I have filled the Victoria Sandwich cake in all the photos, is given as the minimum amount listed, and the greater amount is if you wanted to also top the cake with more piped cream.

 Tip For Icing/Powdered Sugar – to get a nice dusting of sugar on top of the cake (or any of your bakes), don’t use a sugar shaker as the holes are too big. Use a small sieve with finer holes, or even better still a tea strainer/infuser (see one in photo above).
Want to use a bigger or smaller cake tin?
Here are the amounts for using 2 x 8″/20cm cake tins:
225 grams Butter – (8 oz, 1 cup/ 2 sticks). 225 grams Castor Sugar (8 oz, 1 cup of super/extra fine sugar). 4 Eggs, medium 0r large (US Large or XLarge). 225 grams Self-raising Flour (8 oz, 1¾ cups Self-rising Flour + 1 tsp Baking Powder OR 1¾ cups Plain/All Purpose Flour + 4tsp Baking Powder). 1 tsp Vanilla Extract. 1 tbsp Milk. Double/Heavy/Whipping Cream -280ml/9½ fl oz, 1⅛ cup. 6 tbsp Jam.
Tip For Icing/Powdered Sugar – to get a nice dusting of sugar on top of the cake (or any of your bakes), don’t use a sugar shaker as the holes are too big. Use a small sieve with finer holes, or even better still a tea strainer/infuser (see one in photo above).
Want to use a bigger or smaller cake tin?
Here are the amounts for using 2 x 8″/20cm cake tins:
225 grams Butter – (8 oz, 1 cup/ 2 sticks). 225 grams Castor Sugar (8 oz, 1 cup of super/extra fine sugar). 4 Eggs, medium 0r large (US Large or XLarge). 225 grams Self-raising Flour (8 oz, 1¾ cups Self-rising Flour + 1 tsp Baking Powder OR 1¾ cups Plain/All Purpose Flour + 4tsp Baking Powder). 1 tsp Vanilla Extract. 1 tbsp Milk. Double/Heavy/Whipping Cream -280ml/9½ fl oz, 1⅛ cup. 6 tbsp Jam.

 If you want to make in a bigger or smaller tin, see my 2 article links below:
How to increase a recipe for a bigger tin size
How to reduce a recipe for a smaller tin size
If you want to make in a bigger or smaller tin, see my 2 article links below:
How to increase a recipe for a bigger tin size
How to reduce a recipe for a smaller tin size

 See my Raspberry Ripple Victoria Sandwich version, (photo above), or the Chocolate Victoria Sandwich recipe below.
For more tips for troubleshooting any problems you might have with Victoria Sandwich cakes (or any cakes), that don’t rise enough, see before the Recipe Card. And also check my lesson on Over-mixing & Dense Cakes. See the Lessons page.
See my Raspberry Ripple Victoria Sandwich version, (photo above), or the Chocolate Victoria Sandwich recipe below.
For more tips for troubleshooting any problems you might have with Victoria Sandwich cakes (or any cakes), that don’t rise enough, see before the Recipe Card. And also check my lesson on Over-mixing & Dense Cakes. See the Lessons page.

 Cake Recipes Page
Spring & Easter Baking
Mother’s Day Recipes
Tropical Cake Truffles (below)
Cake Recipes Page
Spring & Easter Baking
Mother’s Day Recipes
Tropical Cake Truffles (below)

 References:
1, 2 – from: https://www.freezeit.co.uk/can-you-freeze-victoria-sponge/
References:
1, 2 – from: https://www.freezeit.co.uk/can-you-freeze-victoria-sponge/
Nutritional Values – I am not a qualified nutritionist, and all values, are approximate, using the ingredients listed, with jam & cream only. Assumes a yield of 8 slices, where 1 slice is 1 serving. Make more or less slices, and these values will change. All values calculated via MyFitnessPal.com.
Subscribe For More Recipes
Join My Facebook Group
Why not also join my – Facebook group Easy Online Baking Lessons, dedicated to this baking lessons website, as well as providing one-on-one support with myself & my team? Be sure to answer all security questions when requesting to join.
Follow me on social media:
Happy Learning & Baking!
Caro x


Classic Victoria Sandwich Cake For Beginners
Search For Something You Fancy!
Caroline’s Easy Baking Lessons


Just wondering if you can provide the weight in grams for 1⅓ cups Plain/All Purpose Flour before adding the 2¾ tsp Baking Powder. To equal 162 total grams, my guess is 149 grams based on the weight of baking powder. Same question for the 8-inch pan quantity: what is the weight in grams of 1¾ cups Plain/All Purpose Flour prior to adding 4tsp Baking Powder? My guess would be 142 grams based on the baking powder weight, but that is slightly less flour than used in the batter for the 6-inch pans. Clearly, I’m off somewhere and hoping you can clarify.
Hi Becky
No need to take any account for the baking powder weight. I often make it myself using the plain/A.P. flour and then add the baking powder. The gram amount for the plain flour is the same as listed for the self-raising flour. And the 7g difference you mentioned is because measuring cups are not as accurate as scales and grams. So to answer your questions, you are looking to add the quoted gram amount of flour, then add the baking powder on top of that. The weight of baking powder is not enough to make any real difference. So 1.33 cup flour is 162g flour, 5.75 oz. For the 8″ cake 225g (8 oz). Hope that helps.
Thank you so much for the quick reply, Caro! I’m always thrown by recipes with self-rising (UK self-raising) flour, and I don’t want to buy yet another flour type. This is very helpful! I truly appreciate your attention to detail.
Not a problem at at all. yes having too many flours they end up runnign out right? All recipes will be like I mentione din last comment so you should be good to go. Any other questions, just message back. And don’t forget a photo!
This is an excellent tutorial. Great step by step instructions. I know people have problems sometimes with getting a nice light sponge but follow this recipe and you will have a lovely sponge
Just love the look of your Victoria Sandwich cake, and the tip for the cream. A true classic. Going to make this weekend and use your formulas for making in a bigger tin. Thanks again for another great recipe
So glad you love it and be sure to share pics in the FB group.